
Netgear Orbi Login and setup is your first step to accomplish better WiFi everywhere. Orbi with its tri-band WiFi technology, delivers supreme wireless connectivity. That too without any lag or dead zones. It’s latest mesh technology, that enhanced your traditional wireless network to an exceeding version. This provides fast, reliable and better WiFi coverage in every corner. Coming to the setup part, Orbi routers are very easy to setup using orbilogin com. After the Orbi WiFi setup, it blankets your home with secure and steady WiFi. This obviate the need of running around looking for stable connectivity. Hence you can stream where-ever you want, without any worry. So let’s get Ready, Set and Stream!
For Netgear Orbilogin setup
first you must get familiar with the device.
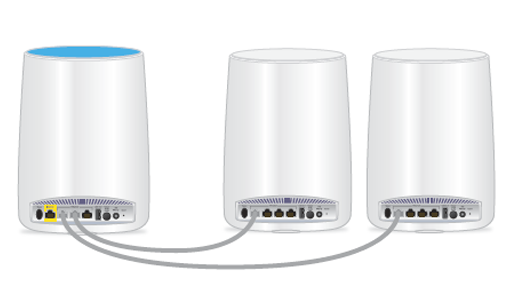
Netgear Orbi WiFi Setup via orbilogin com requires hardware unit setup and then Netgear Orbi login. Orbi kit contains an Orbi WiFi router and the satellite. The number of satellites can be varied such as one, two or three as per your need. For hardware unit setup, you need to be aware of the use of each hardware element of these units. And also with orbilogin admin guidelines.
There are individual hardware elements of these units such as light ring and LED’S. Let us guide you with role of each of these in Netgear Orbi Login and setup:

Power LED
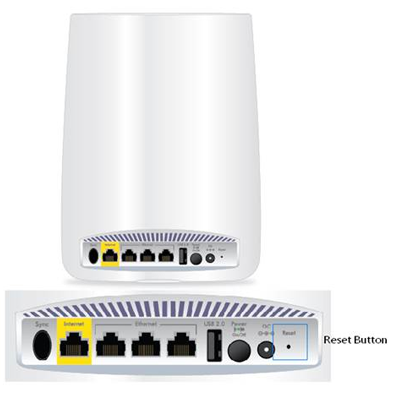
- The Power LED is on the rear panel of your device above the power button.
- When it lit solid green, that means the device is well connected to the power supply.
- Solid Amber on power LED denotes the rebooting of the device.
- Blinking amber resembles the resetting of device to factory defaults.
- If LED is blinking red, that means there is an issue with the firmware.
- In case the LED is not lit at all, there is no power connected to the device.
Router Top Ring LED
- This LED is in the ring shape and located on the top of the router.
- When it is solid white, it means router is in booting state.
- If it’s off, router has finished booting and is working now.
- Blinking ring LED in white means router is resetting to default settings.
- If it is blinking amber, the router is unable to connect to the internet during Netgear Orbi login.
- Blinking blue and magenta signifies that you have reached the maximum allowed internet traffic so your internet is blocked now.

Satellite Ring LED

- The satellite LED as like the router ring, is located on the top.
- Solid white LED resembles that satellite is under the booting process.
- When it becomes off, satellite has finished booting after Orbi WiFi setup and is functioning now.
- If the LED is blue for 15 seconds, the connection between the router and satellite is good.
- In case its appears Amber, it means the connection between the router and satellite is not up-to mark.
- Blinking Magenta signifies is not connected with the router at the time of Netgear Orbi login.
- If the LED is glowing solid magenta for 10-15 seconds. It resembles that satellite is unable to get an IP address through the router.
- Blinking of ring in white states that the satellite is under the sync process.
- Blue light ring for a few seconds means the Netgear Orbi setup process is successfully completed.
- However, if the LED glows magenta after the sync process, the router and satellite is failed to sync.
Orbi WiFi Setup Instructions For Hardware
Now as you’re familiar with each hardware unit and the role of its each elements, let us help you with Netgear Orbi setup instructions for hardware setup. orbi-setup.net website has answers to all your queries, troubleshooting steps and setup instructions for setting up Netgear Orbi Router and Netgear Orbi Extender.
Hardware Configuration for Orbi Router require prior to Netgear Orbi Login:
- First, you have to shut off the modem.
- Remove the power cable or the backup batteries.
- Then unplug your existing router.
- Now you’re ready to install Orbi using Orbilogin.com guidelines.
- Unplug the Ethernet cable from the modem.
- Reconnect the power supply or the batteries to the modem.
- Use the Orbi’s Ethernet cable to connect the Orbi router and modem.
- Connect the power adapter to the electric outlet.
- Plug the other end of power cable to the DC port of Orbi router.
- Check the power LED, if it does not light press the power button.
- The router ring LED will show a blinking white light during Orbi login.
Hardware Configuration for Orbi Satellite
- Place the satellite to a central location of your premise or as you like.
- Connect the power adapter to the power outlet.
- Plug the other end of power adapter to the power port of satellite.
- When successfully connected to a power source, the power LED will emit white light.
- If the power LED doesn’t show the white light, press the power button.
- Let it establish the connection with Orbi router for Netgear Orbi Setup, it will take two minutes.
- In the mean time, the satellite’s LED will emit white with pulses and once the connection is made, it will emit solid magenta.
- However, if it is showing Amber , move the satellite closer to the router for successful Orbi login.
- Finally press the sync button of both the devices simultaneously and let the sync takes place.
Connecting Orbi to the Network
After the hardware setup, you need to connect to the Orbi’s network for Netgear orbi admin login. You can do this either wired or wirelessly.
- Wired Connection
- Wireless Connection
- Netgear Orbi Login Steps
- Complete the Configuration
Connect your computer to the Orbi’s router through an Ethernet cable and connect to router’s local area network:
- Ensure that router is well connected to the power supply.Check the power LED for this.
- Now connect one end of the Ethernet cable to the Ethernet port of the computer.
- Connect the other end to the Orbi router’s Ethernet port.
- A confirmation message will appear on your screen that you’re connected with the LAN network.
Various Orbi Setup Issues and their Solutions
In case if you’re struggling with the Netgear Orbi login or setup issues, go through the guidelines given below.
Can’t access Orbilogin.com or Orbilogin.net for Netgear Orbi Setup or orbilogin not working?
Don’t worry it happens with the best of us, just follow these steps and get rid of this error:
- First of all, check that your Orbi devices are properly connected to the power supply.
- Thereafter check the connection between the device and the Orbi router or the Orbi’s wireless network.
- Use the router’s default IP address to access orbilogin.net.
- You can find the IP address on the label of the router.
- If you have changed the IP address, use your new IP address instead of the one mentioned on the label.
- Check the internet connectivity if still orbilogin com not working for Orbi login.
- In case you’re connected wirelessly with Orbi router, establish a hard wire connection using the Ethernet cable.
- Check the connection between the modem and Orbi router.
- The cables should be connected to the proper ports and are not loose.
- Also ensure that the internet port of the modem is not hardware impacted.
- Try different web browser to access orbilogin net or orbilogin com.
- Also try clearing cache and cookies of the browser and then go for orbi app login.
If nothing works, connect some other device and then try to access the Orbi setup portal.
Help Tip: If your modem and Orbi router have the same IP address then you will face orbilogin not working error. To resolve this change the IP address of your router or the main modem to something unique.
If still can’t get access to Orbilogin.com, then its time for Orbi factory reset.
Orbi Factory Reset | Reset Orbi
Note: Resetting the Orbi router will erase all of the customized settings. These settings include router’s network name SSID, password , recovery options and the access point settings (if enabled).
Here are the steps for Orbi factory reset:
- Ensure that Orbi device is well connected to power supply and is powered on.
- Find the reset button on the device.
- Keep the reset button pressed till the power LED starts blinking amber.
- In case if you’re resetting the satellite unit, then the ring LED will glow amber.
- Your Orbi is now reset to factory defaults. You can proceed with Orbi login now.
Once you reset Orbi, the Orbi router and satellite becomes UN-synchronized from each other. You need to sync and reconfigured them again after the reset.
Re-configuring the Orbi Network
After the reset, follow these steps to reconfigure the Orbi network:
- Connect the Orbi router with the modem using the Ethernet cable and to the power source.
- Plug the power cable of the Orbi satellite to the power outlet.
- Press the sync button on both the devices.
- When the sync gets completed, LED on both devices will emit sold magenta light.
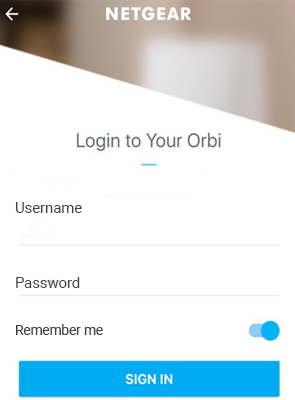
- Thereafter, open Orbilogin.com or Orbilogin net using your Orbi credentials – username and password.
- Click on New setup and follow the on-screen instructions.
- If you have the Orbi application, sign to the application and tap on the menu icon.
- Select “New Orbi Setup” and then follow the on-screen instructions.
If orbilogin not working for you after the reset, refer to the troubleshooting tips provided in the above section. These steps also work for orbilogin forgot password. However, if you wish to setup your Orbi as the access point, check the below section.
How to configure Orbi Router as Access Point?
To configure your Orbi router as the access point you will require:
- Active Internet Connection via DSL or Cable service.
- Your existing router and Ethernet cables.
Steps to configure Orbi Router as Access Point:
- Plug the one end of Ethernet cable to the internet port of Orbi router, and other end to the LAN port of your existing gateway.
- Now open a web browser on the device that is connected to Orbi’s network.
- Type orbilogin net or orbilogin com in the address bar and press enter.
- On the login window, enter the router’s username and password.
- After the Orbi login go to the Advanced section under the administration.
- Click on Router/AP mode.
- Select Access Point mode and tap on “Apply”.
Netgear Orbi Connection Issues
Many users have complaint that they face Netgear Orbi connection issues such as dropping internet connection, iOS disconnection, can’t connect to the Orbi network, Orbi app can not detect the Orbi device and so on. Below we have provided the most relevant solutions for each such issue.
Orbi Dropping Internet Connection
If you are facing Internet dropping issue frequently, execute these troubleshooting steps:
- First things first, check the firmware of the Orbi router and the satellite.
- Firmware of both the units must be of latest version.
- Next is to check the cable connection between the modem and Orbi router.
- Check the wireless functionality of the device on which you are experiencing the Internet dropping.
- Ensure that the satellite and the Orbi router are not placed too far from each other.
- Check the time settings in the security tab under the
- Administration and set it to your local time zone.

Can’t connect to the Orbi network
Can’t connect to Orbi’s network Or it says Internet is offline? Then do this:
- Power cycle the modem.
- Then turn off the Orbi Router.
- Plug out the power cable of Orbi satellites.
- Wait for 20 seconds.
- Then re-connect the power cable to the satellites.
- Turn-on the Orbi Router.
- Check the Internet connectivity now.
- If still it says Internet is offline, then go to orbilogin.com.
- Here check the version of the firmware of your Orbi router.
- If it is outdated upgrade it to the latest one.
Orbi Firmware Update Steps:
- Go to the Netgear download center and search for the firmware of your Orbi router and satellite.
- You can use the model number of your device to search for firmware.
- Start typing the model number on the search bar and it will show you the relevant search result when you finish typing.
- Download the firmware files on your computer.
- Connect this computer to the Orbi’s network and open orbilogin.com.
- Type your username and password and enter to the orbi settings page.
- Go to the administration section and click on firmware upgrade.
- Choose between the router and the satellite and click on firmware upload.
- Select the downloaded file as per your unit and click on Upgrade.
Orbi app can not detect the Orbi device
If the Orbi application is unable to detect your Orbi device, do this:
Ensure that your device is connected with the Orbi’s network. If the Orbi is in Access Point mode, disable this functionality. You can disable the Access Point mode in the Advanced Setup section under Advanced tab. In case you are using the Android or iOS device, ensure that LTE connection is disabled. To disable LTE connection, go to settings and tap on “cellular”. Toggle off the Cellular data switch.
Note: The above steps are for iOS users. For Android users, you need to go to Network & Internet under the Settings. Then tap on Mobile Data and turn it off.
Now open the application, this time it won’t give you trouble in detecting your Orbi device.